If you’ve ever hesitated to try an oven recipe in your air fryer because you’re unsure about the temperature and time adjustments, this air fryer conversion guide is your solution.
It offers a clear, easy-to-use conversion chart that simplifies the process, ensuring your favorite dishes are air-fried to perfection without the guesswork.
Why You Need an Air Fryer Conversion Chart
First things first, let’s talk about why this chart will be your new best friend in the kitchen. The air fryer is a revolutionary gadget that cooks by circulating hot air around the food. It’s quick, it’s healthy, and let’s be honest, it’s fun to use. But since it operates differently from your regular oven, we need to tweak the cooking times and temperatures a bit.
Understanding the Basics of Air Frying
Air frying is all about efficiency. With a conventional oven, you’re heating a large space and often dealing with the hassle of preheating. The air fryer, on the other hand, focuses that heat in a compact area, cooking food faster and more evenly.
Temperature Conversion:
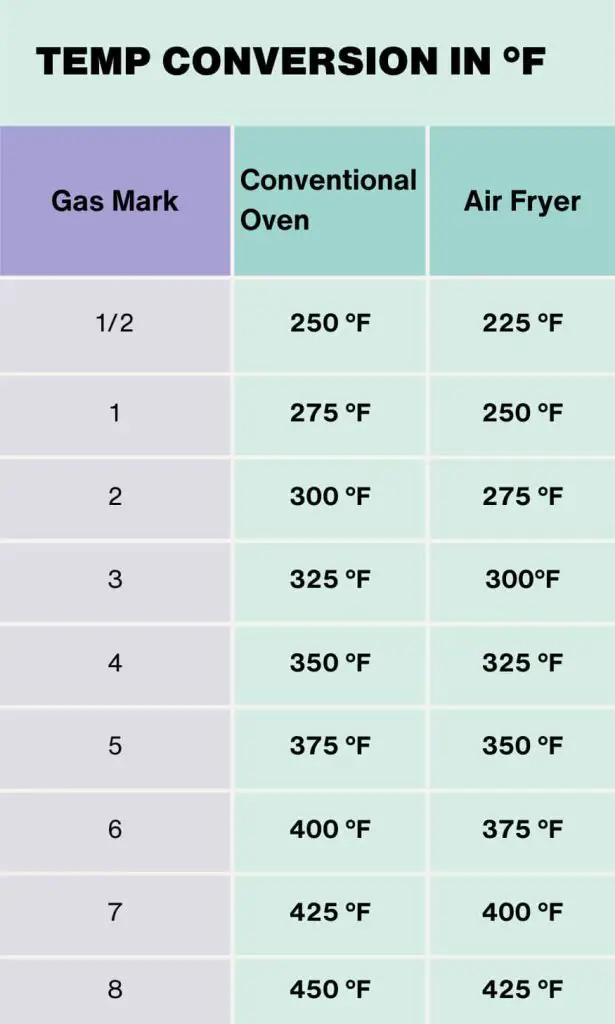
Here’s a simple rule of thumb: Lower the cooking temperature by 25°F when using an air fryer. This adjustment helps to prevent overcooking and ensures that your food retains its moisture and flavor. Below is a detailed breakdown:
- Gas Mark 1/2: Conventional Oven – 250°F, Air Fryer – 225°F
- Gas Mark 1: Conventional Oven – 275°F, Air Fryer – 250°F
- Gas Mark 2: Conventional Oven – 300°F, Air Fryer – 275°F
- …and the list continues.
Timing Is Everything: Quick and Easy
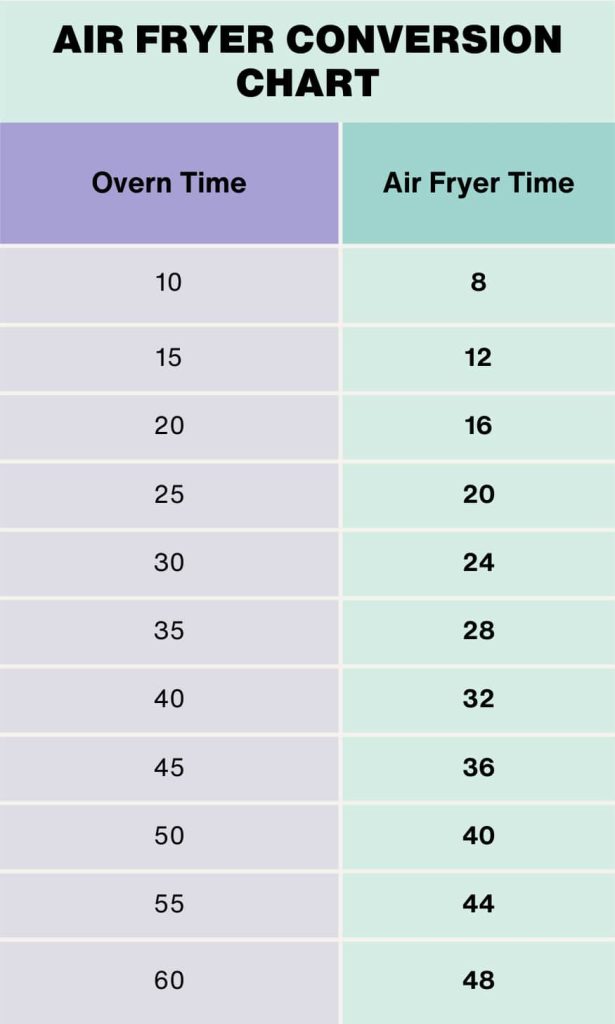
When it comes to time, a good baseline is to reduce the suggested oven time by 20%. For example, if you’re baking cookies that require 10 minutes in the oven, in an air fryer, you’ll only need about 8 minutes. Here’s a quick reference:
- Oven Time 10 min: Air Fryer Time – 8 min
- Oven Time 15 min: Air Fryer Time – 12 min
- Oven Time 20 min: Air Fryer Time – 16 min
- …keep this pattern in mind as you adjust.
Note on Variations
Remember, the 25°F temperature drop and 20% time reduction are starting points. Depending on what you’re cooking and the specific model of your air fryer, you might need to adjust these slightly. Some foods may require a bit more time or a touch less heat, so don’t hesitate to experiment to find that perfect culinary balance. Keep these charts in reach, and you’ll master the art of air frying in no time.
The Conversion Charts:
Now, I’ve prepared two charts for you. The first one is for temperature conversions and the second is for timing conversions. Keep these handy in your kitchen, and you’ll never miss a beat.
Safety First: No Guesswork in Cooking
Remember, using these charts isn’t just for convenience; it’s also about safety. Proper cooking temperatures ensure that your food is not only delicious but also safe to eat.
Fine-Tuning for Perfection
It’s important to note that every air fryer is a bit different, and you might need to make slight adjustments based on your specific model. Don’t be afraid to experiment to find the sweet spot.
Save Energy, Save Time
Another plus of using your air fryer is energy efficiency. Air fryers typically heat up much quicker than ovens, which means you’re saving time and electricity. A win-win!
The Bottom Line: An Effortless Cooking Experience
By following these conversion tips, you can adapt almost any recipe for your air fryer. This means less time spent in the kitchen and more time enjoying your delicious creations.
Happy Cooking!
There you have it, your handy guide to converting oven times and temperatures for the air fryer. Now, you’re all set to transform your favorite recipes into air-fried wonders. Happy cooking, and remember, with a little bit of know-how, your air fryer can be your best culinary ally!

