In this ultimate guide, I’ll walk you through everything you need to know to achieve perfectly risen bread dough, ensuring your baking endeavors are both joyful and rewarding.
The Foundation of All Bread: Understanding Yeast
At the core of bread baking is yeast, a tiny organism that’s been helping us bake bread for thousands of years. Understanding how yeast works is the first step to mastering bread dough. Yeast feeds on the sugars in flour, producing carbon dioxide and alcohol in a process known as fermentation. This carbon dioxide gets trapped in the dough, causing it to rise and giving bread its distinctive texture.
Choosing the Right Yeast
There are several types of yeast available, and knowing which one to use can make all the difference. The most common types are:
- Active Dry Yeast: Requires activation in warm water before use. It’s reliable and widely available, making it a favorite among home bakers.
- Instant Yeast (also known as Quick-Rise or Rapid-Rise Yeast): Can be mixed directly with dry ingredients without needing to be activated first. It speeds up the rising process, ideal for those short on time.
- Fresh Yeast: Also known as cake yeast, it’s highly perishable and not as readily available as its dry counterparts. However, some bakers swear by its quality and flavor contribution to the dough.
Ingredients For Making the Dough
Flour: The Backbone of Your Bread
Flour isn’t just a base; it’s the structure of your bread. The type of flour you choose affects the texture, flavor, and rise of your bread. While all-purpose flour works for many recipes, bread flour, with its higher protein content, is often recommended for its stronger gluten network, which yields a better rise and chewier texture.
Water: The Catalyst of Gluten Formation
Water does more than just combine ingredients; it activates gluten formation. The amount of water used (hydration) significantly impacts the dough’s consistency and the bread’s final texture. A higher hydration leads to a looser dough and a more open crumb structure, characteristic of artisan bread.
Salt: The Flavor Enhancer
Never underestimate the power of salt. Beyond seasoning, salt strengthens the gluten structure and controls yeast activity, preventing over-fermentation. A well-balanced bread not only tastes better but also has a better texture.
Fats and Sugars: The Tenderizers and Feeders
While not essential for basic bread, fats (like oil or butter) and sugars can be added to enrich the dough, contributing to the bread’s flavor, softness, and color. They also provide additional “food” for the yeast, influencing the rise and texture of the dough.
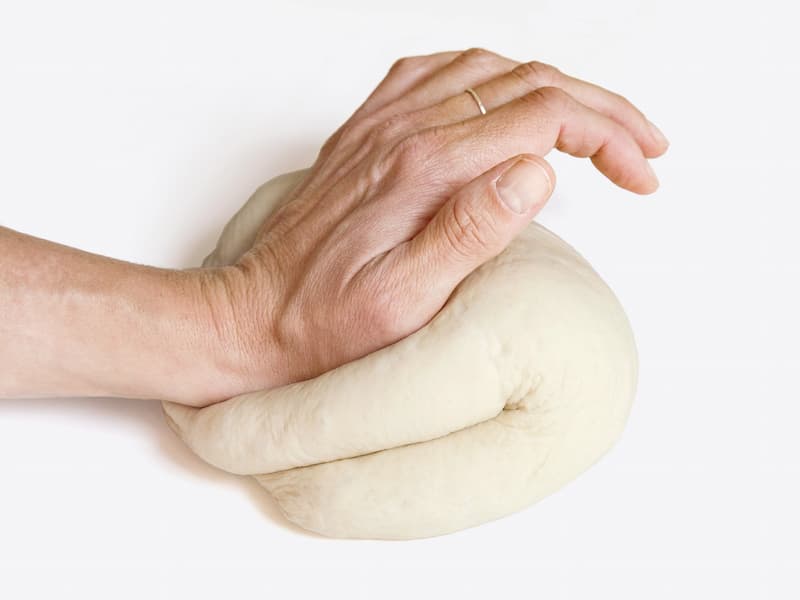
Kneading: The Path to Gluten Development
Kneading dough is about more than just mixing ingredients. It’s a crucial step that develops the gluten network, giving bread its structure and elasticity. Proper kneading ensures your bread will be light, airy, and have that perfect chew.
Techniques for Effective Kneading
Whether you’re kneading by hand or with a mixer, the goal is to achieve a smooth, elastic dough. The dough is ready when it’s smooth, slightly tacky, and passes the “windowpane test” – stretching a small piece thin enough to allow light to pass through without tearing.
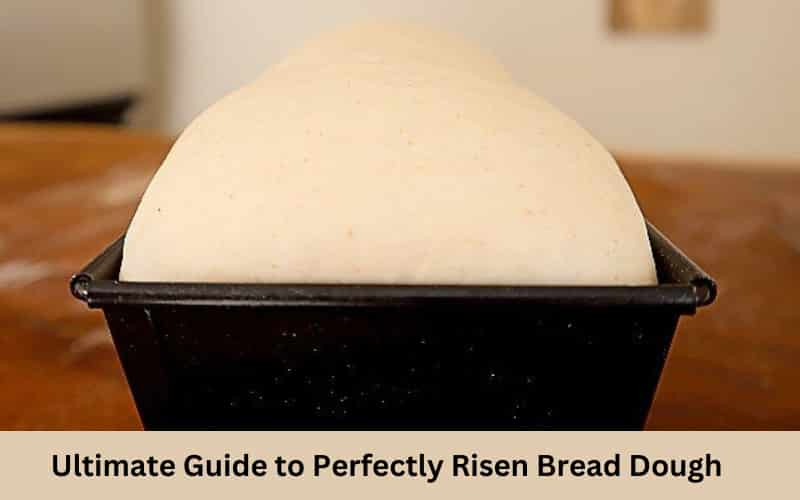
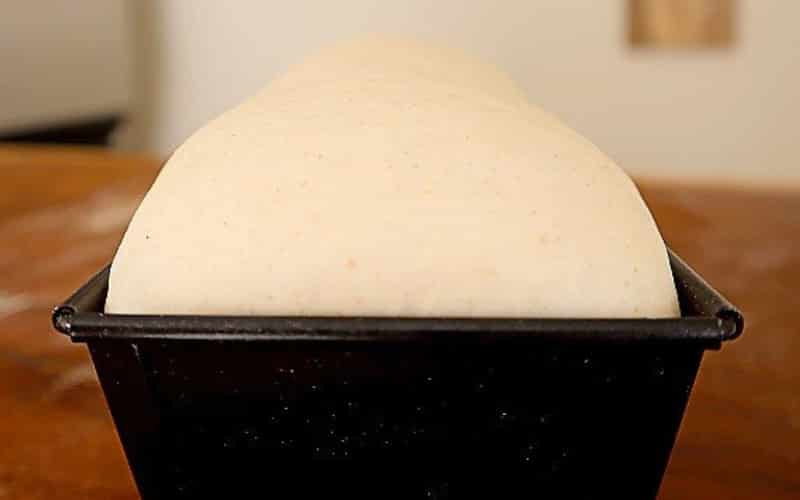
First Rise – The First Fermentation
After kneading, the dough must rest and rise. This first fermentation allows the yeast to work its magic, fermenting the sugars into carbon dioxide and alcohol, which causes the dough to double in size. This process develops the dough’s flavor and texture.
Creating the Ideal Environment for Rising
Yeast thrives in a warm, draft-free environment. A common practice is to place the dough in a lightly oiled bowl, covering it with a damp cloth or plastic wrap to prevent drying. The ideal temperature for rising dough is between 75-85°F (24-29°C). If your kitchen is cooler, you can create a makeshift proofing box in your oven with just the light on or a pot of warm water to increase the temperature.
Dough Shaping
After the first rise, your dough is airy and full of potential. Shaping is not just about aesthetics; it’s about creating tension on the surface of your dough to guide its expansion during baking. Proper shaping ensures even baking and helps you achieve the desired bread shape, whether it’s a boule, batard, or baguette.
Shaping Techniques
- For Boules: Gently deflate the dough on a lightly floured surface. Pull the dough from the outside to the center, rotating as you go, to form a tight ball. Pinch the seams together and place the seam-side down for a second rise.
- For Batards: Start with a round shape, then elongate the dough into an oval. Fold the top and bottom towards the center, then roll gently to seal the seam, tapering the ends slightly.
- For Baguettes: After elongating the dough, fold it lengthwise and seal the seam. Gently roll and stretch to the desired length, tapering the ends.
Second Rise: The Final Fermentation
Also known as proofing, the second rise gives your shaped dough a final chance to ferment and expand. This rise is typically shorter than the first and is crucial for developing the final flavor and structure of the bread. Over-proofing can lead to a dense loaf, as the yeast exhausts its food supply and the gluten structure weakens.
Testing for Readiness
A simple test to check if your dough is ready to bake is the “poke test.” Gently poke the dough with your finger; if the indentation slowly springs back but still leaves a noticeable impression, it’s ready. If it springs back immediately, it needs more time. If the dough collapses, it’s over-proofed.
Troubleshooting: Learning from Bread Baking Challenges
Dense Loaf
A dense loaf could result from insufficient kneading, not enough rising time, or using old yeast. Ensure your yeast is fresh and give your dough plenty of time to rise in a warm environment.
Uneven Rise
This issue often stems from uneven shaping or inconsistent oven temperature. Practice shaping techniques and consider using an oven thermometer to monitor your oven’s accuracy.
Cracked Crust
Cracks can occur if the dough is too dry or the oven is too hot. Ensure your dough is properly hydrated and your oven temperature is correct.
Try These Bread-Related Recipes:
- Mary Berry Soft Bread Rolls
- Mary Berry Hot Cross Buns
- Mary Berry Sourdough Bread
- Mary Berry Caramel Shortbread
- Delia Smith Shortbread Biscuits
- Mary Berry White Bread
FAQs
Why does my bread not rise?
The most common reasons for bread not rising include using old or expired yeast, incorrect water temperature during yeast activation (too hot can kill the yeast, too cold may not activate it), or not allowing enough time for the dough to rise. Ensure your yeast is fresh, the water is lukewarm (about 105-110°F or 40-43°C), and the dough is placed in a warm, draft-free area to rise properly.
How can I create steam in my oven for baking bread?
Creating steam in your oven can be achieved by placing a shallow pan of hot water on the lower rack of your oven during preheating. Alternatively, you can insert the dough and then throw a few ice cubes into the bottom of the oven, or spray the oven walls with water using a spray bottle right after placing the dough inside. This steam helps produce a crispy crust and improves oven spring.
How do you know when bread dough has proofed enough?
Similar to checking if the dough has risen, the poke test applies for proofing as well. After shaping your dough and allowing it to proof, gently poke it. If the indentation fills back slowly and partially, the dough has proofed enough. This means it has the right balance of gas and structure to expand in the oven without collapsing.
Can you let the bread rise for too long?
Yes, allowing bread to rise for too long can lead to over-proofing. When dough over-proofs, the yeast exhausts its food supply, leading to a collapse in structure. This results in a loaf with dense texture and poor volume. If the dough has doubled in size and fails the poke test by not springing back at all, it’s likely over-proofed.
What should bread dough look like before rising?
Before rising, bread dough should be smooth, slightly tacky, and shaped according to the recipe’s instructions. It will appear smaller in size and lack the airiness associated with risen dough. As it rises, expect the dough to become puffier, softer, and double in volume, indicating yeast activity and gluten development.
How long should you let the dough rise?
The rising time for dough depends on the recipe, yeast type, and room temperature. Generally, the first rise (bulk fermentation) can take 1-2 hours at room temperature (around 75-78°F or 24-25°C). For the second rise (proofing), it typically takes about 30 minutes to 1 hour. However, these times can vary; always use visual cues and the poke test to gauge readiness.
How do you fix dough that didn’t rise?
If your dough didn’t rise, it might be due to inactive yeast or a too-cold environment. To fix it, ensure your yeast is fresh and active by proofing it in warm water with a pinch of sugar. If the yeast is active but the dough isn’t rising, move it to a warmer spot or create a makeshift proofing box. If the yeast was old and inactive, you might need to start over with new yeast.
Final Words
Bread baking is an enriching experience, blending art with science. Each step, from choosing ingredients to kneading and rising the dough, is crucial in the journey toward creating the perfect loaf. While I’ve focused on the preparatory aspects, remember that baking is just as important. However, by concentrating on the dough’s preparation, I aim to build a strong foundation for successful baking. Each attempt at breadmaking is a step closer to perfection, with every loaf reflecting your dedication and love for the craft. Happy baking!